
For the past three or four years our family has celebrated the build up to Christmas with an activity advent calendar. As much as I love chocolate (and I really love chocolate! Make no mistake) I find the advent calendars with candy add unnecessary sugar to our diet and the holiday season is already a super-charged sugar-fest. Plus, the spirit of Christmas is so much sweeter when we spend time together and do things for others….see what I did there? So, last year, when I was invited to create a holiday post for Skip To My Lou, I decided to design a printable advent calendar with activities; calling it the Midnight Christmas Village Advent Calendar. I created easy activities intended to encourage family time and neighborhood and community connections. Some of them are a simply as giving each other a hug while others are more complex, i.e. “bake cookies for the neighbors”. These are, after all, the things that really remind us how much we love each other. A bit of chocolate or a toy just doesn’t have that lasting impact. (Of course, if you use my design to make an advent calendar and fill it with toys and chocolate I won’t judge you. Dude. I get it.). Anyhow, this year I thought I would share this project here along with a few other alternative ways to use the same printable in a different style.
Random aside, the black and white design was inspired by the book I was reading at that time, The Night Circus by Erin Mortenson (affiliate link). I highly recommend it. It’s the perfect book for fireside holiday evenings.


Midnight Village Advent Calendar–Wall Hanging Version
SUPPLIES:
- 8-10 pages of light fabric transfer paper such as this (affiliate link)
- 1 1/2 yard white cotton fabric
- 1 yard quilt batting
- standard sewing supplies including an iron
- printer
- exacto knife or scissors
- The Advent Village document , available at the link
PRINTING INSTRUCTIONS:
Open the Midnight Village Advent PDF and print in two phases.
First, print the first 7 pages of the document onto the FABRIC transfer paper (read the product instructions for how to best use this paper in your printer). BE SURE TO FLIP THE DOCUMENT HORIZONTALLY (see photo for example), this will ensure that when you iron on the images, the text and numbers will not appear backwards.
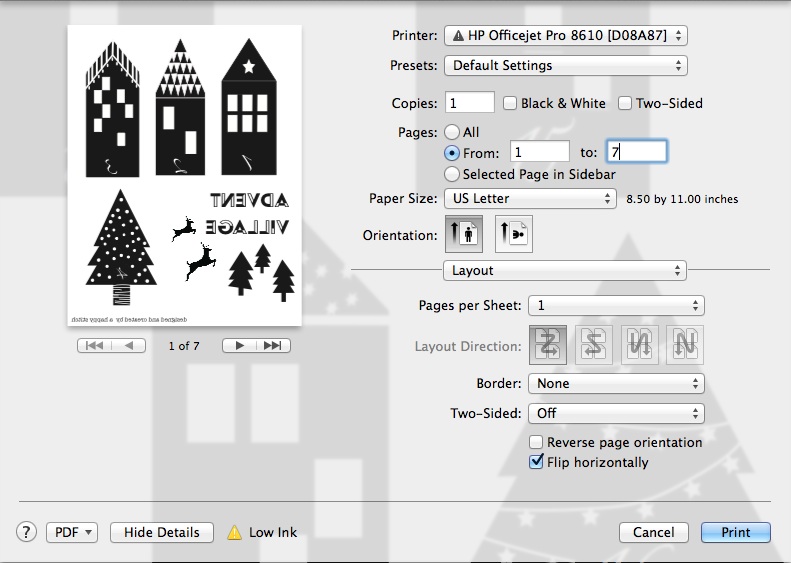
Second, print the final page of the document (the activity slips) on card stock or standard paper. In this case, do not flip the document.
CUTTING INSTRUCTIONS:
Using an exacto knife or pair of scissors, clip closely around the edges of each printed image and the Merry Christmas banner (including any of the add-ons you would like for your top banner).
Cut from the white fabric the following pieces:
- 1 rectangle 4″ x 16″ for the back casing
- 2 rectangles 30″ x 20″ for the base and backing
- 4 rectangles 20″ x 7.5″ for the pocket pieces.
Cut from the quilt batting 1 rectangle 30″ x 20″

SEWING INSTRUCTIONS:
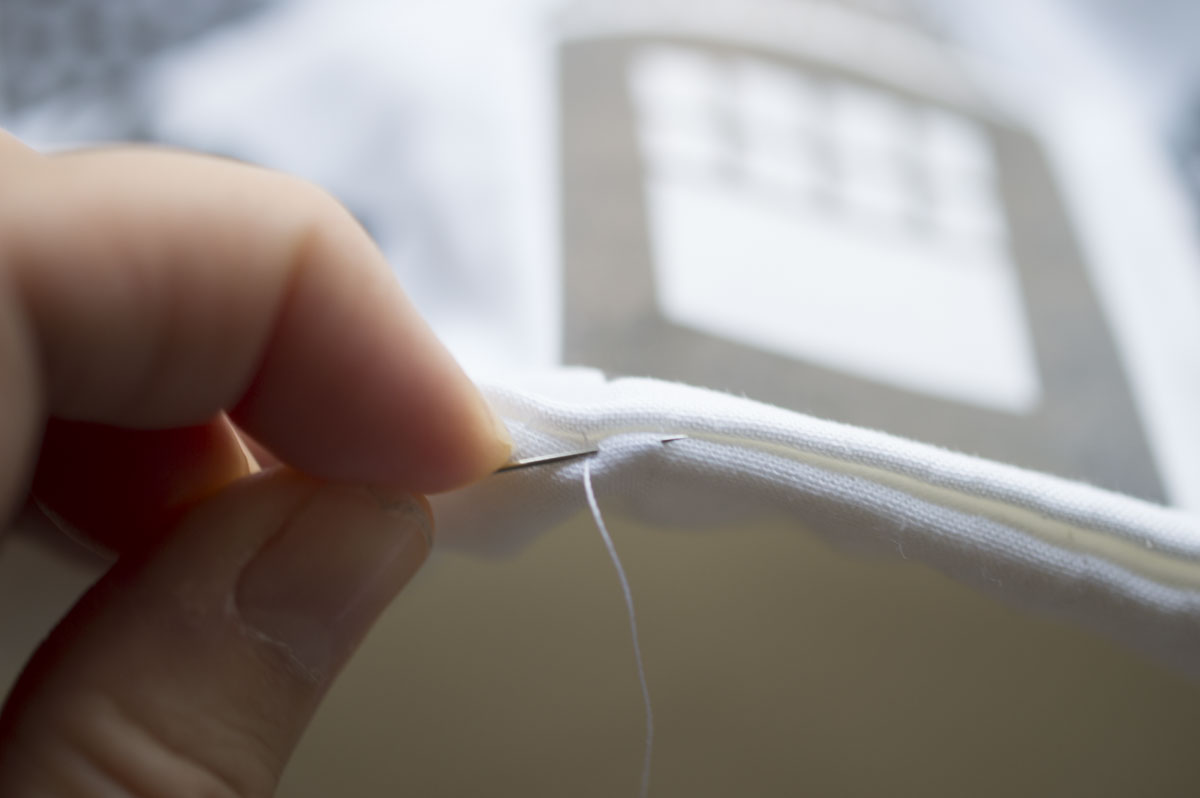
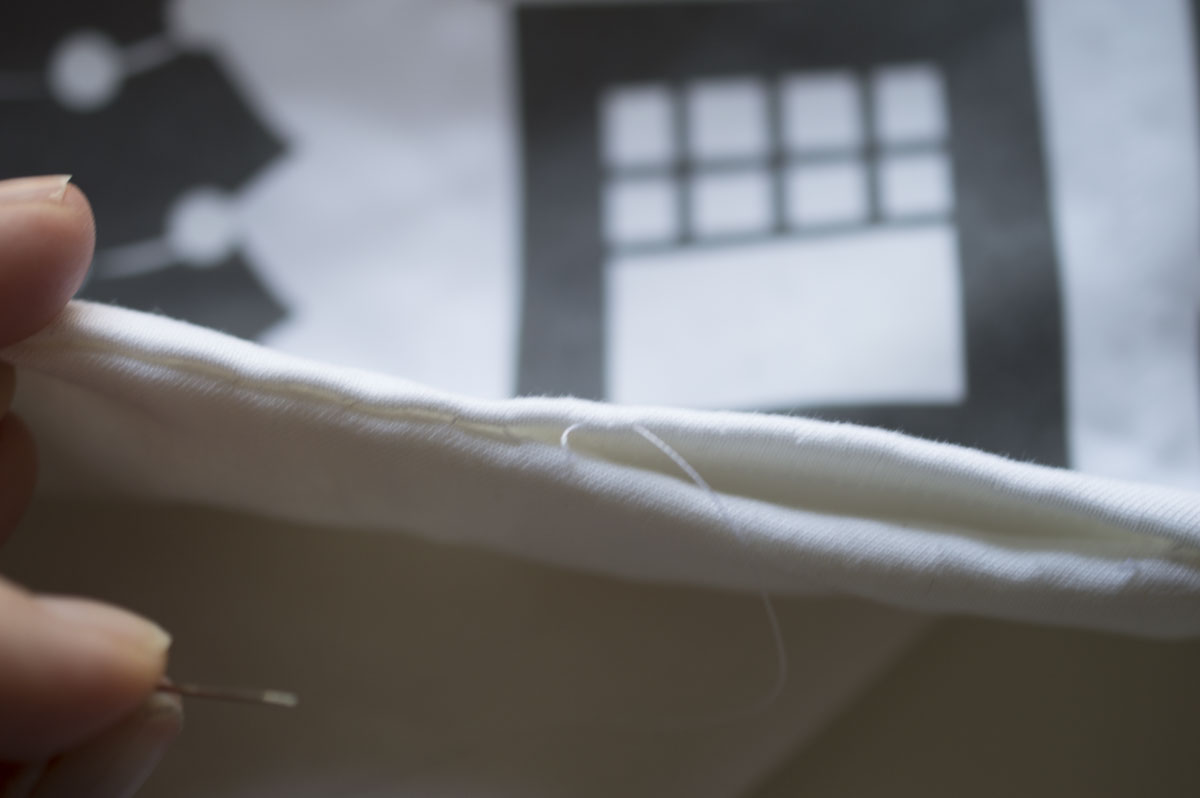
Iron one of the long sides of the pocket pieces over 1/2″ and then another 1/2″ to create a top hem. Stitch the hem closed. Repeat for the remaining 3 pocket pieces.
Iron the bottom, long-side, on three of the pocket pieces up one 1/2″. Do not sew.
IRONING INSTRUCTIONS:
Take the village images you have cut and carefully place them on the pocket pieces in numerical order from left to right placing six images across each pocket piece. Leave room on the left and right side for seam allowances. Be sure to place images #19-24 on the pocket piece that doesn’t have a bottom fold. Remember to place images #19-24 at least a 1/2″ from the bottom of the pocket pieces to account for seam allowances.
Once they are arranged, evenly and spaced as you like best, flip the images over so you are looking at the paper backing. Following the fabric transfer paper instructions, IRON them in place. Take your time and go slow. It’s a little tedious but don’t skimp on this step. Once they are completely cooled, carefully peel off the transfer paper and admire your budding village!
Arrange the Merry Christmas banner on the base fabric, centered and about 1 1/2″ down from the top edge of the 20″ side. Add any of the decorative add-ons you like. Iron in place just as you did with the village.
Sewing DIY
To sew the pockets in place, you will work from the bottom up. Start by placing the pocket with images #19-24 along the bottom edge of the base fabric. Align the pocket with the sides of the base fabric and baste stitch the bottom and sides to hold it in place.
Place the fold of the pocket with #13-18 one 1/2″ above the previous pocket. Pin in place and edge stitch along the bottom fold to secure in place. Repeat with remaining two pockets.
To create individual pockets for each advent day, stitch straight lines between each numbered image.
Prepare the back of the banner :
Place the backing fabric on the quilt batting, aligning all edges. Baste stitch along all four sides to secure the backing fabric and quilt batting together.
Make a casing so you can hang the banner by hemming (folding 1/2″ and then 1/2″) the short sides of the casing fabric. Stitch the hems closed.
Iron each long side of the casing up one 1/2″
Place this casing rectangle 2 1/2″ from the sides of the back portion you just prepared and 2″ from the top so it is centered.
Stitch along both long sides to create a tube.
Place the prepared backing fabric right-sides together with the decorated front piece (you will be looking at the quilt batting) and stitch around all four edges with a 3/8″ seam allowance leaving a 10-12″ opening at the bottom.
Gently turn the whole thing right sides out, pushing out the corners and VERY CAREFULLY ironing alone the edges. Be sure you don’t iron over any of the exposed images as they will melt to the iron.
Slip stitch the opening closed, using a hand sewing needle. To do so, hold each side of the opening together with one hand and slip your stitches from one side to the other.

Place a yard stick or long dowel rod through the casing on the back, attach a ribbon to each end and hang it up.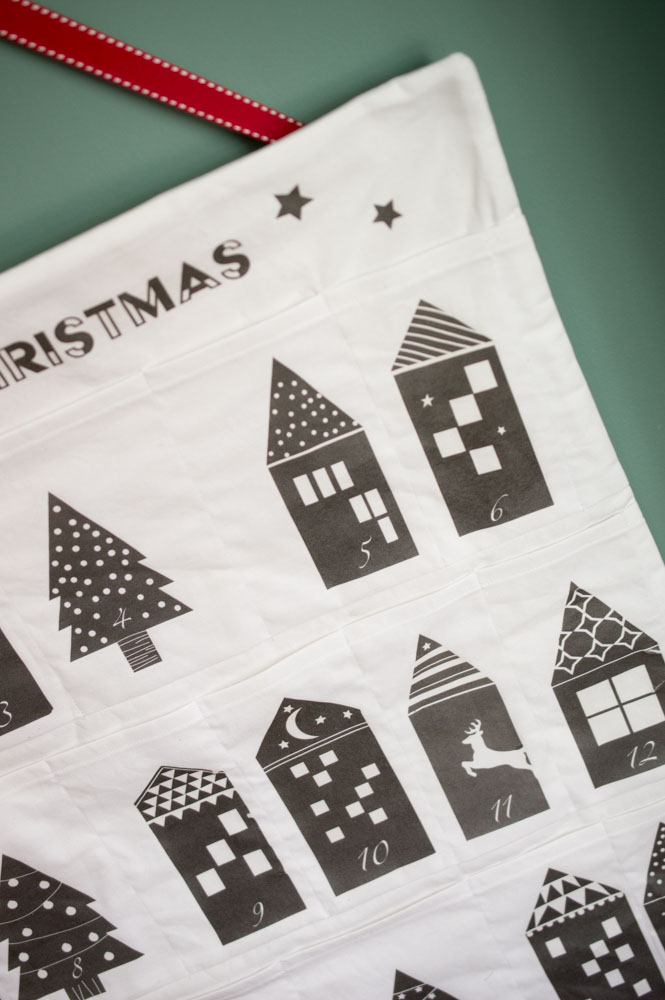
Now, you can cut up the paper advent activities and slip them into the pockets of your choice!


BTW, because some of the activities I created are simple and others are more involved be sure to pay attention to what days you slip these into so you aren’t rushing to finish an activity on a school night. You want to enjoy not resent the activities! I speak from experience on this one.
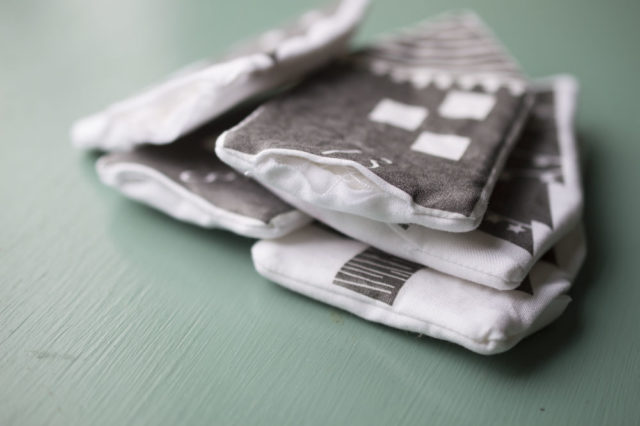
Hanging Garland Option
The other option is to create an advent garland! To make this, create individual pieces and hang them on a string.

To make these I ironed each image just as before and then cut the pieces separate. Next, I simply stitched each separate day onto its own backing, in the same manner as the wall hanging, using a folded piece of fabric on the back to create a small pocket. Once I had 24 individuals pieces, hand-stitched them to red twine.

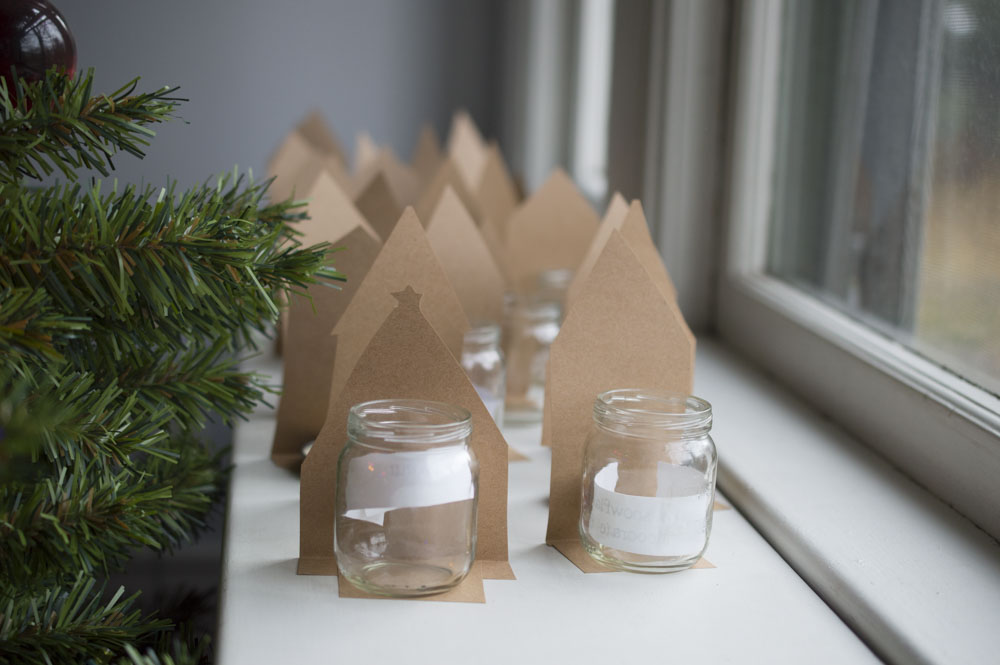
Paper Version–The Easiest
If you don’t have time for sewing (or just don’t want to!), you can print the images onto thicker Kraft paper, cut out each date leaving an extra 4″ or so along the bottom, fold over to create a tab and place baby food jars behind each one to hold the activities. This is definitely the easiest option but still looks really neat.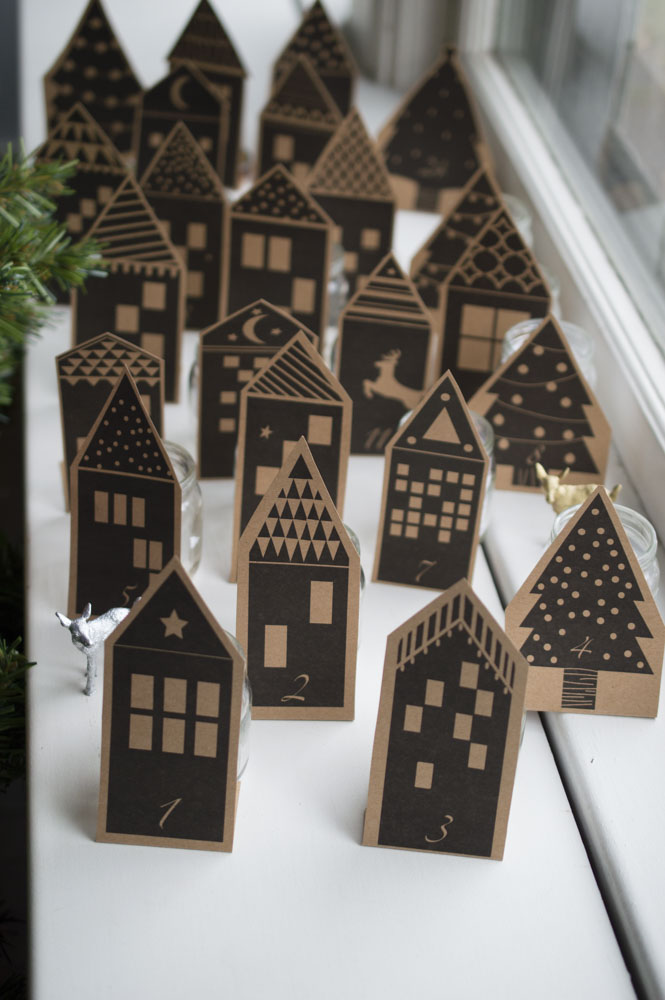
My kids looks forward to our activity advent so much every year, I hope yours will too. Let’s spread the love!
P.S. Isn’t my model the cutest and a complete natural?! I was so lucky my son’s soccer buddy agreed to share his shining smile with me when my own kids refused!

Leave a Reply